I didn't know anyone was finding this blog! If you still want to find updates on these projects, and see new projects, you will find me at StillwaterStrings.blogspot.com as Stillwater Strings & Things. (I copied all the posts over to the new blog)
Projects include:
Bray Pins are finally made
Toolbox for my tools
Woodworking bench and saw horses
Flax to Linen
Flax and wool tools I make
Dollhouse Updates
Circular Sock Knitting Machine
Loom Restoration (Restoring a 100 year old "Bernat" table loom converted to a floor loom; as well as a Bergman table loom)
Weaving
Canning (Almost time for dandelion jelly!)
Gardening
Spinning wheels, yarn, fiber production (Fermented Suint method of cleaning)
Enteral Feeding & Cystic Fibrosis & Toddlers
Harping (the instrument . . . not the other kind)
New nyckelharpa stuff
(house projects like painting and fence building which get in the way of crafting)
Tuesday, May 7, 2019
Monday, October 15, 2018
House Remodel -- small scale
Just so you know . . . I made a new blog and moved all of my posts from LemonFloss to StillwaterStrings.blogspot.com Updates on this project (and new projects) may be found there!
The dollhouse.
I have always been fascinated by miniatures. This Summer (2018) I learned about polymer clay for making miniatures (if you love tiny things, check out Sugar Charm Shop on Instagram and YouTube).
On our way back from a hike at Memorial Falls, we stopped at a wonderful antique and junk shop. In his extra shed, the owner had a dollhouse kit. The DuraCraft FH 505 Farmhouse. He had built most of it to the point of gluing in the walls and floors. He also said his wife had purchased it for him so he would have something to do after retirement.

All the pieces were still with the kit; however, he had purchased plastic windows in lieu of building the wooden windows which came with the kit. I popped out the windows and then removed the floors and walls. The inside had to be gutted and new pieces glued in for the floor bracing. Plus, I didn't like losing two rooms to the stairs, right in the middle of the house. I wanted a larger kitchen, and I wanted the stairs off to the side.
I read somewhere that people who get into miniature dollhouses, are actually living out their wish lists for their own homes. I suspect this may be true!
In the photo above, I have everything ready to be re-glued. I filled in the original stairwell holes and made new holes in the floors and moved the stairs to the side of the house. I also changed the shape of the stairs by adding a turn and landing instead of leaving them straight. I moved the bottom left wall over so that the kitchen could be a bit larger. I moved the wall over to the left on the second floor above the kitchen to make it more of a hallway, and allow the center to become a bedroom or something else (I am thinking of adding a false wall there).
The stairs will both be removable to make wiring or changing wallpapers easier. I have been making "stones" for the chimney (pictured in front of the house) out of drink cup holder trays and egg cartons. I was using my jack plane for a straight edge to hold the walls in place as the glue set.
The house has since been relocated from our garage to our basement so that hubby and I can continue working on it as the weather turns cold. I have glued all walls and floors in place and painted the inside with primer in preparation for wiring for lights. I'm almost finished modge-podging the "stones" around the base of the house. I need to finish the shingles next. Then flooring and wall color or paper or texture . . .
The dollhouse.
I have always been fascinated by miniatures. This Summer (2018) I learned about polymer clay for making miniatures (if you love tiny things, check out Sugar Charm Shop on Instagram and YouTube).
On our way back from a hike at Memorial Falls, we stopped at a wonderful antique and junk shop. In his extra shed, the owner had a dollhouse kit. The DuraCraft FH 505 Farmhouse. He had built most of it to the point of gluing in the walls and floors. He also said his wife had purchased it for him so he would have something to do after retirement.

All the pieces were still with the kit; however, he had purchased plastic windows in lieu of building the wooden windows which came with the kit. I popped out the windows and then removed the floors and walls. The inside had to be gutted and new pieces glued in for the floor bracing. Plus, I didn't like losing two rooms to the stairs, right in the middle of the house. I wanted a larger kitchen, and I wanted the stairs off to the side.
I read somewhere that people who get into miniature dollhouses, are actually living out their wish lists for their own homes. I suspect this may be true!
 |
| The gutted house, ready for the floor braces to be glued in. |
 |
| Some of his shingling! |
 |
| The "new" set-up. |
The stairs will both be removable to make wiring or changing wallpapers easier. I have been making "stones" for the chimney (pictured in front of the house) out of drink cup holder trays and egg cartons. I was using my jack plane for a straight edge to hold the walls in place as the glue set.
The house has since been relocated from our garage to our basement so that hubby and I can continue working on it as the weather turns cold. I have glued all walls and floors in place and painted the inside with primer in preparation for wiring for lights. I'm almost finished modge-podging the "stones" around the base of the house. I need to finish the shingles next. Then flooring and wall color or paper or texture . . .
Linen and Flax
Why not try growing and processing flax for linen?
This Summer (2018) I planted, nurtured, harvested, dried, rippled, water rhetted, and dried (again) line flax. I am now breaking and scutching, and combing (hackling) in preparation for spinning and weaving linen. I'm not surprised society has moved on from making linen this way.
As for myself, I seem to enjoy finicky projects and processing flax to linen fits into the more-finicky side of those projects. I researched vlogs and blogs and a few books, and found a few videos online. Trying this on my own, though, I decided to just go for it and if it flopped I really wouldn't be out anything. I spent a few dollars to buy a pound of seed from a heritage seed project. My hubby tilled a patch in our garden, and we scattered the seed and covered it. I did a bit of weeding initially. Then we simply enjoyed watching it grow and bloom.

The bolls (seed pods) rattle in the wind. I left the plants in the ground until the pods began to change from green to a golden brown. I read conflicting information about the ideal time to harvest: one source said wait until two thirds of the stalk turned yellow, another source said wait until one third was yellow, another said to watch the bolls.
I pulled them up, bound them in bundles and stacked them in the garage to dry.
 This is where I really began to deviate. I waited until the seed pods had all turned brown--it took about three weeks. I made an honest attempt to ripple the seeds (collect the seeds) in the way presented as traditional, using anything resembling a comb or pitchfork to draw the stalks through and knock off the seed pods. This only sent seed pods flying everywhere and tore off the ends of the flax plants.
I decided the process didn't much resemble "rippling". What I did instead was take a small bundle at a time and arrange the bundle so that the seed ends rested inside an open garbage bag. Then, wearing gloves and leg protection, I rolled the stalks up and down my shins working up toward the tips of the plants rolling those in just my hands. It worked perfectly! And it looked more like grass "rippling" in the wind. The seed pods/ bolls came of easily into the bag, and my plant stalks weren't damaged in the process (plus any leaves or dirt clods still on the stalks also came off).


Altogether, after sorting the seed from the chaff, my collected seed weighed in at four pounds!
 Next came the water rhetting-- causing the plants to rot to the point of releasing the bast fibers from the stalky pith. My father-in-law brought an old garden tub (used to make a fish pond, I think) to our house. I plugged up the holes and put enough water in it to submerge two batches of flax. I had it in full-sun and covered with a plastic painting tarp. I have no idea what the temperature was. Both batches began to bubble within 24 hours and the first batch finished in about four days, the second took a bit longer because the weather cooled a bit. Again, I had no idea what I was doing or looking for. The information I read gave, again, conflicting experiences/ opinions. I simply checked it daily by picking up a few pieces and rubbing the root-end with my thumb to see if the green skin came away from the inner stalk. Then took it out to lay in the sun to dry.
 I don't have a flax break, so I have been breaking it by hand a little at a time. This will work for now, since there isn't an overwhelming amount this year; however, if I plant all four pounds of seed next year . . .
Breaking it by hand is a little like pinching the edge on a pie crust.
Then I take a little at a time and scutch it--that is, I knock the pith/ stalk out of it. Again, I don't have a scutching board or sword. Perhaps it is the wrong thing to do, but I found a butter knife worked well against my thigh. Using the non-cutting edge of the butter knife, held against my thigh, I hold the broken flax in one hand lying on my thigh (wearing tough jeans), lay the knife over it and then pull the flax up until all the pith is out.

I had the good fortune of finding two flower frogs (antique metal pin things for flower arrangements) with very fine teeth/pins, which work perfectly for combing the flax. Then I twist the fibers into stricks. I was surprised to find the fibers measuring about 30 inches long after combing. I also am saving the tow (the fibers which come out as I comb).
As I scutched the flax, it did curl (like the ribbon on a gift when curled with scissors) counter-clockwise, and then straightened when I combed it. I had read that it should be spun counter-clockwise. Can't wait to try spinning!
This Summer (2018) I planted, nurtured, harvested, dried, rippled, water rhetted, and dried (again) line flax. I am now breaking and scutching, and combing (hackling) in preparation for spinning and weaving linen. I'm not surprised society has moved on from making linen this way.
As for myself, I seem to enjoy finicky projects and processing flax to linen fits into the more-finicky side of those projects. I researched vlogs and blogs and a few books, and found a few videos online. Trying this on my own, though, I decided to just go for it and if it flopped I really wouldn't be out anything. I spent a few dollars to buy a pound of seed from a heritage seed project. My hubby tilled a patch in our garden, and we scattered the seed and covered it. I did a bit of weeding initially. Then we simply enjoyed watching it grow and bloom.
 |
| Broadcasting seed |
 |
| Flax is the grassy-looking patch in foreground of photo and to the left of the garden plot. The flax patch to the left near the trees did not do as well as the patch in full sun. |
 |
| The blooms open in the morning and close by the afternoon, daily. |

The bolls (seed pods) rattle in the wind. I left the plants in the ground until the pods began to change from green to a golden brown. I read conflicting information about the ideal time to harvest: one source said wait until two thirds of the stalk turned yellow, another source said wait until one third was yellow, another said to watch the bolls.
I pulled them up, bound them in bundles and stacked them in the garage to dry.
 This is where I really began to deviate. I waited until the seed pods had all turned brown--it took about three weeks. I made an honest attempt to ripple the seeds (collect the seeds) in the way presented as traditional, using anything resembling a comb or pitchfork to draw the stalks through and knock off the seed pods. This only sent seed pods flying everywhere and tore off the ends of the flax plants.
I decided the process didn't much resemble "rippling". What I did instead was take a small bundle at a time and arrange the bundle so that the seed ends rested inside an open garbage bag. Then, wearing gloves and leg protection, I rolled the stalks up and down my shins working up toward the tips of the plants rolling those in just my hands. It worked perfectly! And it looked more like grass "rippling" in the wind. The seed pods/ bolls came of easily into the bag, and my plant stalks weren't damaged in the process (plus any leaves or dirt clods still on the stalks also came off).


Altogether, after sorting the seed from the chaff, my collected seed weighed in at four pounds!


Breaking it by hand is a little like pinching the edge on a pie crust.
Then I take a little at a time and scutch it--that is, I knock the pith/ stalk out of it. Again, I don't have a scutching board or sword. Perhaps it is the wrong thing to do, but I found a butter knife worked well against my thigh. Using the non-cutting edge of the butter knife, held against my thigh, I hold the broken flax in one hand lying on my thigh (wearing tough jeans), lay the knife over it and then pull the flax up until all the pith is out.

I had the good fortune of finding two flower frogs (antique metal pin things for flower arrangements) with very fine teeth/pins, which work perfectly for combing the flax. Then I twist the fibers into stricks. I was surprised to find the fibers measuring about 30 inches long after combing. I also am saving the tow (the fibers which come out as I comb).
As I scutched the flax, it did curl (like the ribbon on a gift when curled with scissors) counter-clockwise, and then straightened when I combed it. I had read that it should be spun counter-clockwise. Can't wait to try spinning!
Thursday, September 20, 2018
Finding Balance in the Swing of Things
After how many years? The bray harp finally has brays. My tools finally have a toolbox. I am processing and spinning wool. I grew line flax this year and am surprised to claim success through the whole process of retting (water rotting), breaking and scutching (knocking the pith/ stalk out of the bast fibers), hackling/ combing the fibers into silky ponytails ready for spinning, and also collecting the seeds--one pound yielded four pounds . . . it's no wonder peasants starved and froze, or that linens became heirloom objects . . . I'll just do a separate post about the linen flax.
In addition to fiber processing I seem to find no end of interesting projects to distract me from dishes and laundry and the medical routine of our kids. The first half of the woodworking bench top is complete. I will need to return to the lumber store for more wood as some of my pieces went missing in the course of other projects (hubby and I built a fence around the yard).
We were given apples so I canned 13 pints of apple butter. I also made dandelion jelly first thing in the Spring. I finally found a recipe and tried almond croissants. I confess that I'm so out of shape, I was sore the next day from working the dough . . . but they were worth it!
I am crossing an item off my bucket list: a dollhouse. I never played with dolls but have always been fascinated by miniatures and longed to experience the process of making a dollhouse. We found a "Dura-Craft FH 505 Farmhouse" this Summer. The elderly gentleman I bought it from said his wife bought it for him when he retired because "she thought he needed something to do." It was mostly built, but needed to be gutted so it could be wired--expect a separate post about this project.
I have another project I will post about as soon as things are finalized; but, at the risk of being mysterious, I can't post yet.
My most recent project is tied to my fiber art. I have discovered the rabbit hole of the Circular Sock Machine (CSM). If your husband is kind enough to buy you wool, and you want more wool, you need to find a way to use said wool. To be fair, I have made (am still making) an honest attempt at knitting with needles--double point, two-at-a-time, magic loop--a pair of socks. They may never be finished, or by the time they are my daughter's granddaughter will have to wear them. Oh, the CSM! Someday, I hope I will own one, shiny and new from Earlbacher Gearheart. In the meantime, of course, I am trying to build my own to see if it's possible to make a functioning machine with inexpensive materials I can manipulate with the tools I have on-hand. Expect this to become a separate post, also. If anyone actually reads my blog, and has a CSM hanging about the house/basement/ attic/ barn/ shed and you want it to go to a loving home where it will be used, please send it to me!
Our little ones have their own projects going. Ashlynn is three years old now and loves to paint. Andrew is almost two and his thing is music. He has discovered the harmonica, and last night after my failed attempt at playing it he said, simply, "nope," and ran off with it honking out notes as he went.
Tuesday, February 7, 2017
The Road Less Travelled
"Lord willing" has lately become the amen of any plan I make. My lumber remains uncut in the wood shop, which is just as well when the temperatures are below freezing and there isn't a heat source.
At the end of October 2016, my husband and I delivered our second child, a sweet baby boy. Complications changed all the plans and hopes we had for his birth, and we ended the event by air-lifting to Seattle Children's Hospital. We have been living in Seattle for several months now. The short story is that our son also has cystic fibrosis which caused some issues requiring four surgeries (three in his first week of life, and the fourth taking eight hours!). God is so good! Our little boy is doing well now, though his progress in recovery is slow, we are working toward a possible transfer back to Montana . . . in a few months.
In the meantime, with the hours spent at the hospital I thought I might study the Swedish language. I've acquired a "teach yourself" book with CD's and a basic grammar workbook. Also, I anxiously await the arrival of "Bygg en Nyckelharpa" on dvd purchased through Amazon.com (produced by Rita Leydon and available on her website and Amazon; following the builder, Soren Ahker).
I'll fine-tune my drawings and cut list for my new nyckelharpa so that I can can get right to work when we finally come home.
Other woodworking projects and plans put on hold: The Dutch toolbox is nearly finished! I made a dealgan (Scottish drop spindle. I got tired of breaking my delicate top-whorl spindle) using my power drill as a lathe. I'd like to make flower boxes for the deck railing. My hubby wants a bench by the back door for putting on and taking off/ storing shoes. A toy box for our kids. Etc, etc.
We'll see how far I get . . . Lord willing!
Tuesday, May 3, 2016
Nyckelharpa #2 - Planning
Just so you know . . . I made a new blog and moved all of my posts from LemonFloss to StillwaterStrings.blogspot.com Updates on this project (and new projects) may be found there!
I recently had a fantastic opportunity to have a nyckelharpa lesson with Aryeh Frankfurter when he and his wife came through Montana on part of their performance tour. The amount of information he gave me was enormous for a beginner. The main thing, I believe, is to play the instrument. I have a long road to travel as a nyckelharpa player, but I'm now pointed in the right direction.
I am also excited to build a second harpa. I was allowed to take a side-by-side picture of Aryeh's nyckelharpa and mine. He insisted I try playing his instrument. It was much lighter and although the same overall length, it was slightly narrower and seemed easier to hold for my small size.
My goal on this harpa isn't to recreate the other craftsman's design, but rather to incorporate those differences I liked and felt would improve my first instrument. Lighter and "smaller".
My sweet husband took me shopping for wood at Winsor Plywood, where I picked up some more alder, but also purchased some vertical grain fir to use on the top and bottom. The grain on the VG fir is very close and very straight, looking similar to spruce. It is also a slightly harder wood than spruce according to the Janka hardness scale.
 The shade of the wood is closer between the two.

And the grain of the fir can be seen here.
Design main changes I hope to incorporate:
I recently had a fantastic opportunity to have a nyckelharpa lesson with Aryeh Frankfurter when he and his wife came through Montana on part of their performance tour. The amount of information he gave me was enormous for a beginner. The main thing, I believe, is to play the instrument. I have a long road to travel as a nyckelharpa player, but I'm now pointed in the right direction.
I am also excited to build a second harpa. I was allowed to take a side-by-side picture of Aryeh's nyckelharpa and mine. He insisted I try playing his instrument. It was much lighter and although the same overall length, it was slightly narrower and seemed easier to hold for my small size.
My goal on this harpa isn't to recreate the other craftsman's design, but rather to incorporate those differences I liked and felt would improve my first instrument. Lighter and "smaller".
My sweet husband took me shopping for wood at Winsor Plywood, where I picked up some more alder, but also purchased some vertical grain fir to use on the top and bottom. The grain on the VG fir is very close and very straight, looking similar to spruce. It is also a slightly harder wood than spruce according to the Janka hardness scale.


And the grain of the fir can be seen here.
Design main changes I hope to incorporate:
- longer and narrower neck/ keybox
- shorter and narrower body with a thinner top and bottom
- bent-wood top instead of planed/carved
- minor adjustments to bridge, string nut and keys
This time around, I'd like to try steaming/bending the top instead of planing it to shape, so I'll be needing to build a steam box and a jig for shaping.
Sunday, May 1, 2016
The Bray Harp
Just so you know . . . I made a new blog and moved all of my posts from LemonFloss to StillwaterStrings.blogspot.com Updates on this project (and new projects) may be found there!
The bray harp is mostly finished. All it lacks at this point are actual "brays". I was eager to string it and hear its voice, so I opted for pins without the bray portion (which I can fabricate and glue on later). This will be a brief run-down of its construction, as I'm moving and beginning a new project . . . another nyckelharpa!
 Here are the back and front of the soundbox, and the string rib which is glued to the inside of the front or "soundboard" of the box. The entire harp is made out of bird's eye maple (Winsor Plywood was having a 1/2 price sale). This hard wood was difficult to work at first. A woodworker at the local school helped me rip the boards closer to the thickness I desired.
My husband bought me a saber saw and new ROS for our first anniversary--nothing says "I love you" like more tools!

However, the tool I had the most success with on this tricky grain was my little cabinet scraper. I learned how to turn a good burl on this simple piece of steel, and finishing (though still a lot of work) was much easier and even faster than using a sander.

Because this is a medieval harp, the tension of the strings is much less than that of a modern harp. That being so, the grain on the soundboard could be vertical. The sides and end caps of the soundbox are shown here. The bottom is slightly deeper than the top, and slightly wider, too.
 I used regular Titebond glue to laminate two pieces together for the pillar. On the rest of the joints, though, I learned how to use a two-part epoxy with a filler (wood flour I saved and sieved for the very finest dust), since the epoxy is more forgiving if my surfaces aren't perfectly flush.

Once again, I borrowed some time on the drill press at the school shop building, so that my peg holes would be straight. This harp doesn't use fret pins. I learned how to use a taper-bit, and I think I got the hang of it by the 16th hole. Even if your taper drilling is great, there will still be some variation between individual pins, so you insert the pins and then swap out the ones that stand proud with those that sink a little too far.

The carving along the neck is actually functional for the harp. It creates a ridge on which you can fret and get sharp notes. I had to carve away quite a bit at the knee block so the top strings could vibrate freely.

The completed harp with the first strings attached. You can see there is a very slight curve to the pillar. I'm not sure why it was designed that way.

The other side of the neck with a great view of the grain on the back of the soundbox. I just love the grain of this wood!

Decorative sound holes and the front of the pillar. The pillar is the only thing I'm not happy with. I had planned to us three pieces so they would be even, instead I used a thick and a thin piece, which works but doesn't appeal to my eye. The reason I did it that way is that I didn't want to have to cut and thickness another two pieces (aka I got lazy).

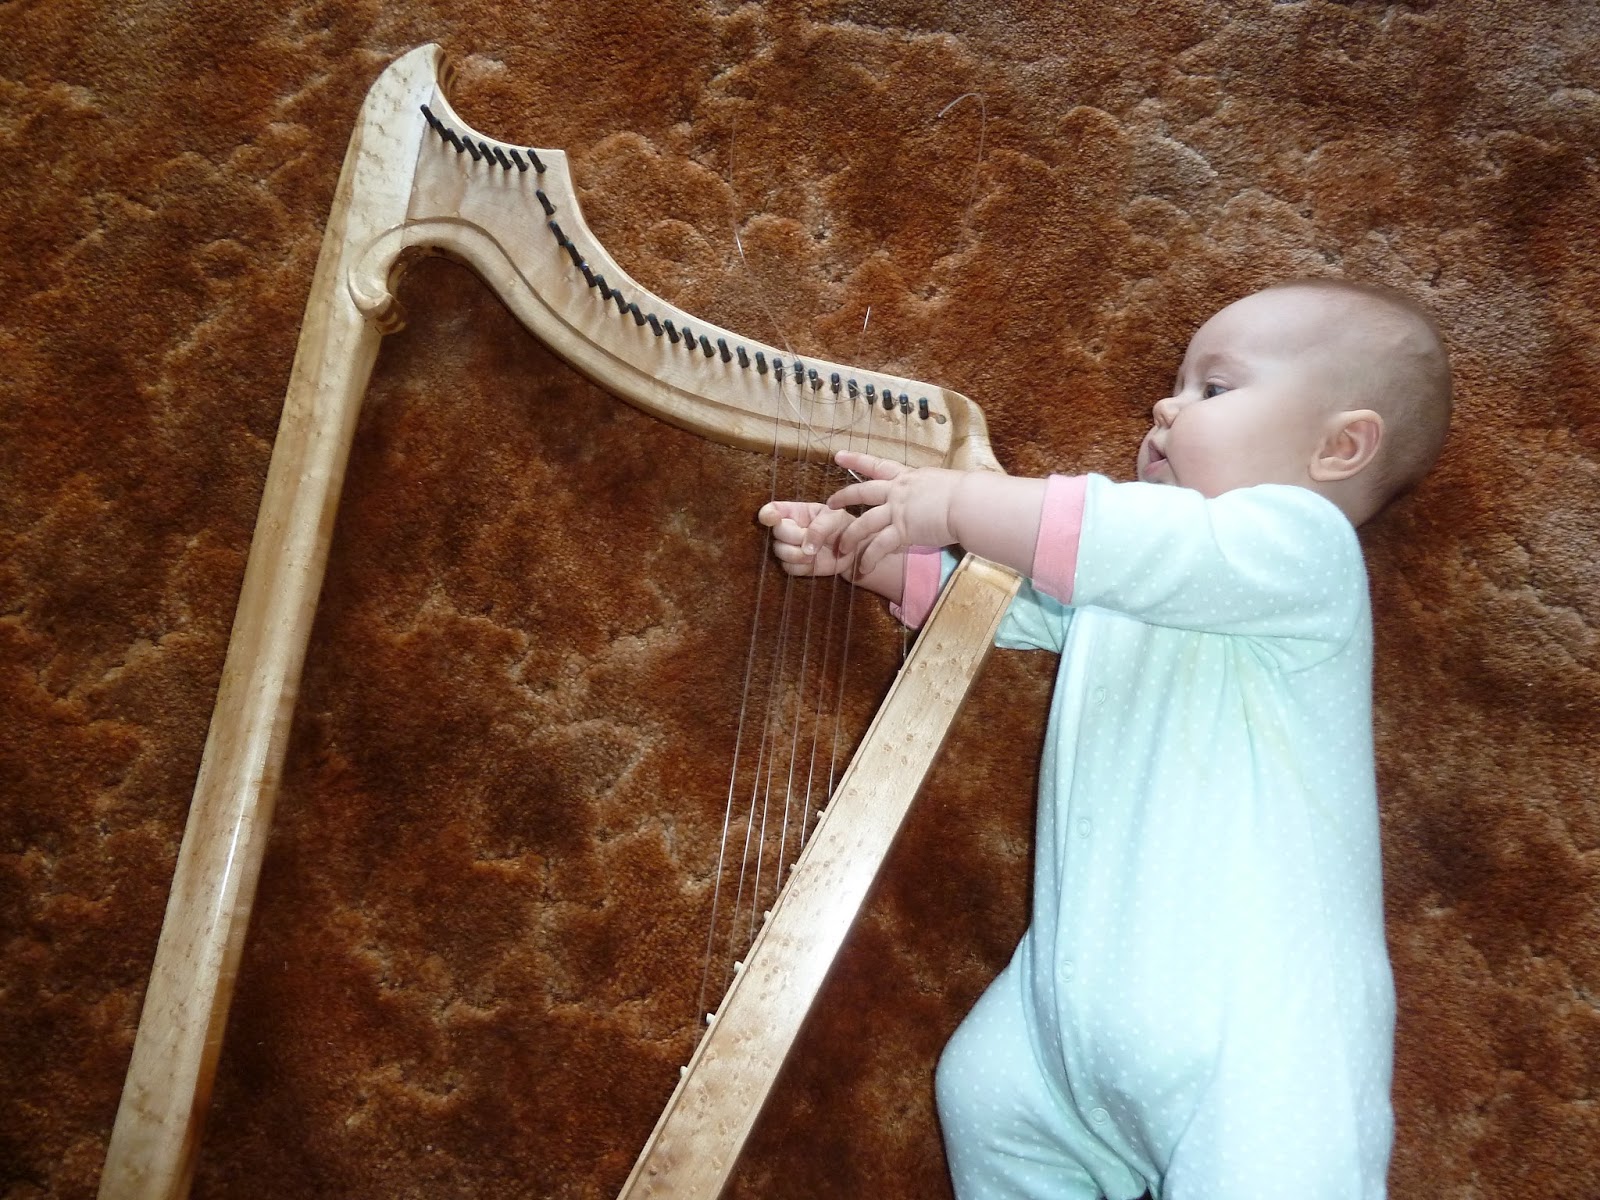
A first test drive!
I do hope to make the brays, having planned ahead and making my pins so that I could "simply" take the pins out and glue on the brays. The brays can be "turned off" by twisting them to the side if I don't want the bray sound.
Rick Kemper of Sligo harps has a building guide for this harp for sale on his website, as well as blueprints for his own line of celtic harps (As well as finished harps for sale)!
The bray harp is mostly finished. All it lacks at this point are actual "brays". I was eager to string it and hear its voice, so I opted for pins without the bray portion (which I can fabricate and glue on later). This will be a brief run-down of its construction, as I'm moving and beginning a new project . . . another nyckelharpa!
 Here are the back and front of the soundbox, and the string rib which is glued to the inside of the front or "soundboard" of the box. The entire harp is made out of bird's eye maple (Winsor Plywood was having a 1/2 price sale). This hard wood was difficult to work at first. A woodworker at the local school helped me rip the boards closer to the thickness I desired.
My husband bought me a saber saw and new ROS for our first anniversary--nothing says "I love you" like more tools!

However, the tool I had the most success with on this tricky grain was my little cabinet scraper. I learned how to turn a good burl on this simple piece of steel, and finishing (though still a lot of work) was much easier and even faster than using a sander.

Because this is a medieval harp, the tension of the strings is much less than that of a modern harp. That being so, the grain on the soundboard could be vertical. The sides and end caps of the soundbox are shown here. The bottom is slightly deeper than the top, and slightly wider, too.
 I used regular Titebond glue to laminate two pieces together for the pillar. On the rest of the joints, though, I learned how to use a two-part epoxy with a filler (wood flour I saved and sieved for the very finest dust), since the epoxy is more forgiving if my surfaces aren't perfectly flush.
Once again, I borrowed some time on the drill press at the school shop building, so that my peg holes would be straight. This harp doesn't use fret pins. I learned how to use a taper-bit, and I think I got the hang of it by the 16th hole. Even if your taper drilling is great, there will still be some variation between individual pins, so you insert the pins and then swap out the ones that stand proud with those that sink a little too far.

The carving along the neck is actually functional for the harp. It creates a ridge on which you can fret and get sharp notes. I had to carve away quite a bit at the knee block so the top strings could vibrate freely.

The completed harp with the first strings attached. You can see there is a very slight curve to the pillar. I'm not sure why it was designed that way.

The other side of the neck with a great view of the grain on the back of the soundbox. I just love the grain of this wood!

Decorative sound holes and the front of the pillar. The pillar is the only thing I'm not happy with. I had planned to us three pieces so they would be even, instead I used a thick and a thin piece, which works but doesn't appeal to my eye. The reason I did it that way is that I didn't want to have to cut and thickness another two pieces (aka I got lazy).
A first test drive!
I do hope to make the brays, having planned ahead and making my pins so that I could "simply" take the pins out and glue on the brays. The brays can be "turned off" by twisting them to the side if I don't want the bray sound.
Rick Kemper of Sligo harps has a building guide for this harp for sale on his website, as well as blueprints for his own line of celtic harps (As well as finished harps for sale)!
Subscribe to:
Comments (Atom)